
When I created a photobooth with the netbook to take pictures at my wedding, I needed to carry the netbook as well as all the camera equipment on the overseas flight to Poland. I had minimized it as much as I could, but it was still a lot to travel with. I wanted to try and do something similar but go much smaller and use a Raspberry Pi instead of the netbook to eliminate as much of the weight as I could. This post explains how I was able to do it.
Hardware
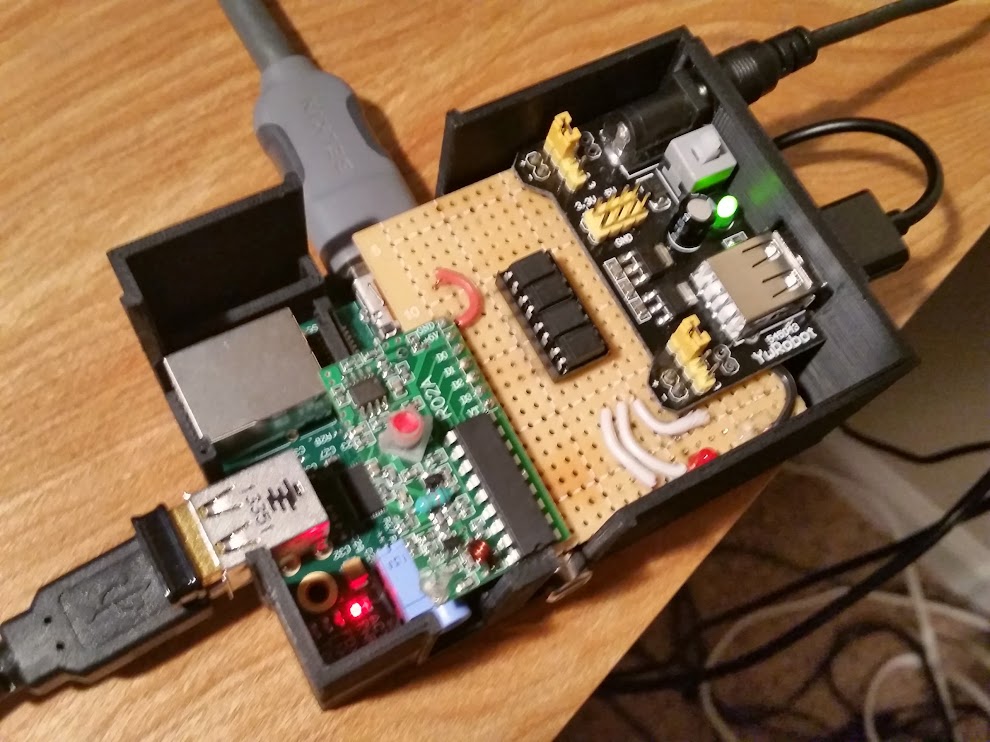
The hardware is a Raspberry Pi with a custom PCB that lays on top of the GPIO header like an Arduino “shield”. The board allows me to interface the RPi with the 315mhz reciever. Since the output from the receiver is 5v and the RPi can only take 3v input, I used opto-isolators to separate the RPi from the receiver.
The black case is a 3D printed design that was made to fit the custom board but had holes for all of the Raspberry Pi inputs and outputs. I measured so the RPi would fit snugly. On top of the Raspberry Pi GPIO header I have a quick and dirty PCB that has leftover Arduino headers into a plain Radioshack protoboard. The PCB is just made up of lines of solder that have leftover resistor legs that run the length of each trace. I like doing this way so that I can quickly rework the design as necessary.
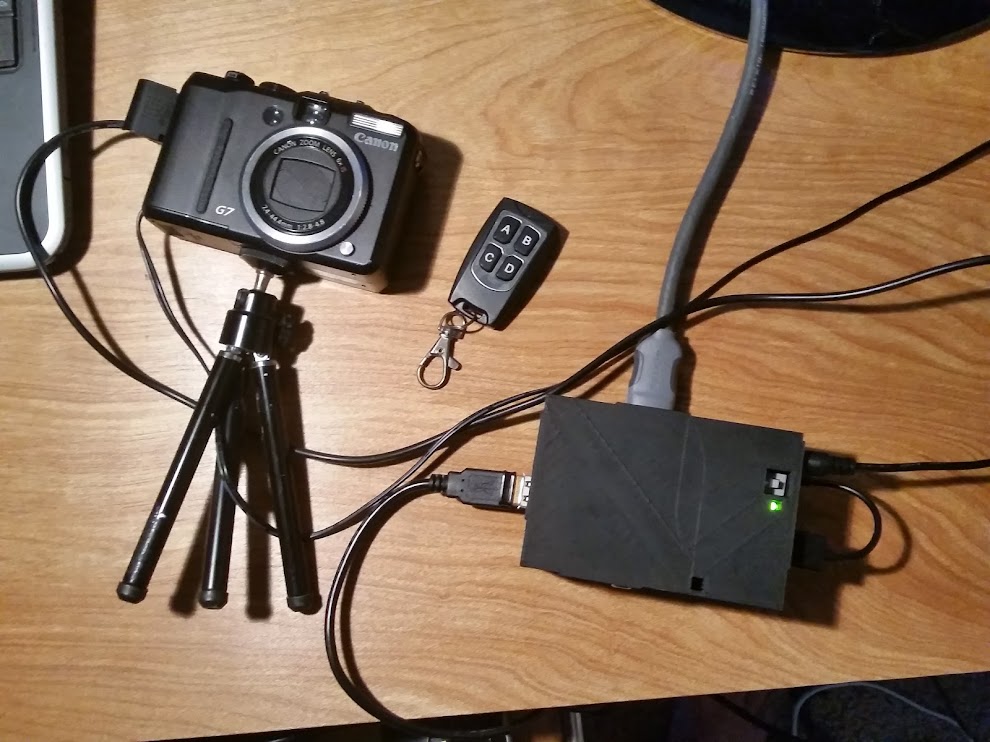
The photo on the right above show the entire hardware needed: a camera, 4 button controller and the black case containing the Raspberry Pi and custom board. the only other required item (not shown) is an HDMI compatible monitor or tv.
 |
 |
 |
| Custom GPIO protoboard for connecting the RPi to the 315mhz receiver | ||
Software
The Python code is listed here on GitHub:
https://github.com/contractorwolf/RaspberryPiPhotobooth
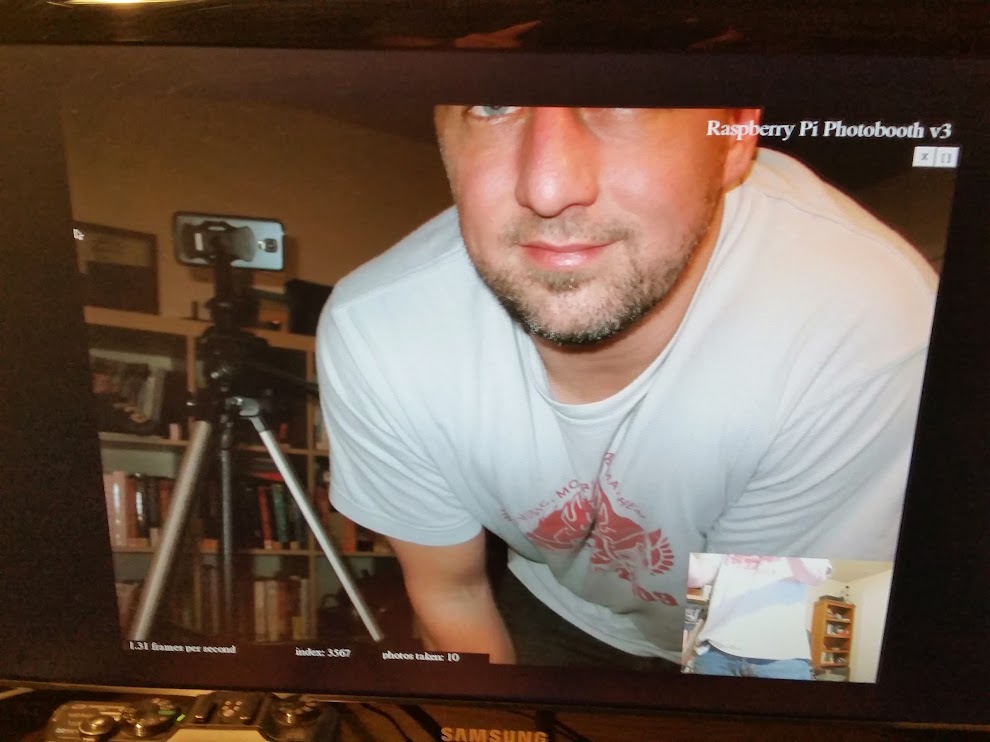
On the Raspberry Pi I am running a PyGame app I wrote in Python that uses the Gphoto2 library for communicating with the camera. The Gphoto2 library uses simple terminal commands to do basic functions on a camera and has a long list of cameras that it can control. The PyGame app is just listening for button presses and updating the screen with the preview image coming from the camera.
The software is started from terminal, and can easily be started on boot. It starts and loads the images for the slideshow, showing the loading progression of all the .JPG files in the directory. When they are all loaded it gives you a message and the main loop starts. While it is running it is continuously loading the preview image that comes out of the camera (after a gphoto2 command). It is small and lower resolution, but enough to show what the camera can see.
To grab the preview image I am calling this gphoto2 command:
gphoto2 --capture-preview --filename preview.jpg --force-overwrite

In the main loop the Photobooth flips between the images, and listens for button press events to come from the 315mhz transmitter. There are four button on the controller: A, B, C, and D. They preform the following functions:
A. takes a picture and load to the screen.
B. show the last image taken by the camera
C. show previous image (in slideshow)
D. show next image (in slideshow)
To take a high definition image using the camera and load it into the Pygame app I am calling this gphoto2 command:
gphoto2 --capture-image-and-download --filename images/{image_name}
with the {image name} being unique each time with a time-stamp. The actual format I used for the image name looks like this: “capture2014-04-24_01_21_11.jpg” (with date/timestamp).
The Pygame app actually makes the call and continues looping until the image appears in the folder before attempting to display the image. This ensures that the execution doesn’t block the listening functions of the main loop. Since the RPi is somewhat lower powered, I needed to write as much of the app as I could in a non-blocking manner.
When any of these buttons are pressed a message is showing on screen that gives the user feedback. After a picture is taken and displayed, the device attempts and asynchronous upload of the image to Google Drive. I made sure to separate the upload process and make sure the Photobooth is working in a separate thread, again so its not waiting. The posting to Google Drive seems to auto-post to my Google Plus stream as well, which is a bonus.
Info on posting to your google drive in python:
https://developers.google.com/drive/web/quickstart/quickstart-python
My variation on their example code that allows for storage of the credentials for future use, and setting of a specific folder:
https://github.com/contractorwolf/GDriveUpload/blob/master/upload.py
needs to be executed like this (when used alone):
sudo python upload.py document.txt
3D Print the Plastic Case

I designed a simple case that compression locks together. Here are the files so that you can print the STL’s directly, or modify the SKP (SketchUp design file) to fit your needs. I have an Up Plus 2 Printer that prints very precisely, you may need to adjust your tolerances to fit the quality of the printer you are using. My design files are completely open, use them however you wish and feel free to edit them.
SKP file: Raspberry Pi Photobooth SketchUp Design
(you will need to download the free version of SketchUp to view/edit this file)
STL file: Raspberry Pi Photobooth Base STL
STL file: Raspberry Pi Photobooth Top STL
Other Important Documentation:
There are several steps to getting the Raspberry Pi ready to run the Pygame app that I wrote. My post assumes you have the latest version of Raspbian installed and will require you go though (at minimum) the following steps:
Install GPhoto2
sudo apt-get install gphoto2
Controls the camera over USB
Update Gphoto2 to the latest version (currently 2.5.2)
https://github.com/gonzalo/gphoto2-updater
Install Adafruit GPIO Library
http://learn.adafruit.com/adafruits-raspberry-pi-lesson-4-gpio-setup/adafruit-pi-code
or use these commands in terminal:
sudo apt-get install git

git clone http://github.com/adafruit/Adafruit-Raspberry-Pi-Python-Code.git
Install the Python GPIO libraries for accessing the pins in python
sudo apt-get install python-dev

sudo apt-get install python-rpi.gpio
Install Pygame
sudo apt-get install pygame
Pygame is the interface for the visuals as the app is running.
Uploading to Google Drive
https://developers.google.com/drive/web/quickstart/quickstart-python
Please feel free to leave me questions or comments if you are trying anything similar. I would be happy to help with what I have learned so far. If you have a project that uses any of the info that I included please send me a link!

Very nice work! Have you released your PyGame app somewhere ?
Alexandre,
I just made the github repo public here:
RaspberryPiPhotobooth
Hi James,
Very nice job.
I’d like to replace the 4 buttons controller with a Webui.
But I couldn’t launch Photobooth.py. I get
Traceback (most recent call last):
File “photobooth.py”, line 13, in
import pygbutton
ImportError: No module named pygbutton
Any idea?
Best regards.
Alain,
looks like the links I had before for installing the pygbutton no longer work, but i do have some notes on it on google drive that might help you figure out how to use it:
https://docs.google.com/document/d/1x_jnhmJss2yBOKYjkFaP4IX504xzj_aiOjFN50oJSMU/edit?usp=sharing
actually, here is the code for pygbutton.py:
http://inventwithpython.com/pygbutton.py
if you arent using the button though, you mgiht want to just remove this line “import pygbutton” and all the references to anything that had “pygbutton” in it. The code should work fine without it.
James,
I ‘ve commented the pygbutton lines.
It works fine.
I m trying to replace the buttons orders and led signals with the Webui.
Do you have suggestions?
Have you taken a look at Flask? Its a very easy way to run a web app in python and works well on the RPi.
Thanks for your suggestion.
I’ll have a look.
I wanted first to adapt this :
http://techlife.blaize.net/2014/04/20/gphoto-webui-a-php-web-ui-for-gphoto2/
Dear Alain,
Thank you for your work on this. This is amazing. I was wondering though if you could trim down the code to a more basic format so that I can edit to suit my needs?
I’m looking into not having an added camera, instead use the raspberry pi camera, so the use of gphoto2 for me is obsolete. I’m not sure how to modify the code to show my pi camera feed in the bottom.
Also, I won’t be using a 334hz remote but just a button, I’m also not sure how to reflect that?
I’d very much appriciate some help, thank you!
Great tutorial, helped me a lot building a photobooth for my wedding 🙂 I uploaded my modified version of the code here: https://github.com/thomastvedt/Photobooth in case anyone is interested. The code isn’t perfect, after all I had to focus on actually getting married and not programming.. 😛
At first I tried using gphoto2 and a Canon 1100d, but I couldn’t charge the battery while it was in the camera (stupid). I also tried a webcamera, but picturequality wasn’t good enough. In the end I used a raspberryPi camera which worked ok.
Thomas thanks for posting details about yours. I hit the same battery issue initially but was able to find a AC powered (plug in) battery pack for my camera that looks like a battery and fit into the camera so that it was always powered. The RPi camera wasnt quite high enough quality for what I was trying to do. I think it is very cool that so many guys were able to do this for their weddings! It was a big hit at mine.
Thank you for posting your source code. I’ve tried using you codes. but I just want to ask, how can i capture image using my Canon 1000D. And where in your code has the function of capturing image. thank you. i hope that i can hear anything from you. 🙂
Red,
The main part of using an external camera with the Raspberry Pi is the code for GPhoto2 which is a module that you can install on the Raspberry Pi. The way to take a picture after you have installed Gphoto2 is to open the terminal and execute this command:
gphoto2 --capture-image-and-download --filename picture.jpg(you can call the file whatever you want)
If Gphoto2 is installed and your camera is supported by gphoto2 (check the post for how to determine if your camera is supported) you should see the camera take a photo and save it locally with whatever filename you gave in the terminal command. My python code is simply executing those commands in the background and them loading the images into the pygame app I am running for display.
Hi,
I’m trying to use your app but when I launch it, I see the video interface after the first pic has been taken but it cycles without end taking pictures.
Do you know what configuration part could I have missed ?
I don’t have the remote for now. Is it possible to use the mouse instead ?
Thanks.
Regards,
Julien
Wait, it does what? Does it display the slideshow at all? How are you triggering the camera? Explain clearly what you are seeing
I start it from command line, it starts full screen, load a preview or the last pic and show a fix image in right lower corner. Besides, DSLR takes pictures at every cycle but those pictures never appear on the screen. Then, when I quit I see a lot of tmp…. files (pictures actually) in the app directory.
Is it clearer ?
I’m using a 1100D Canon by the way.
Julien,
Taking pictures with buttons in the pygame app was how I did it before I created the remote control. I think I was using the pygbutton to create and onscreen button that was accessible to the mouse in the pygame app:
https://github.com/asweigart/pygbutton
I would back up a bit an test taking the pic via the command line first to verify that the 1100D responds top the normal command set in a normal way. Run this line:
sudo gphoto2 –capture-image-and-download –filename images/testimage.jpg
Hi. Im making a photobooth here for my thesis, how did you do that video on the screen? Because after following all your steps a “pygame error:No video mode has been set” occured. Thanks.
Hey,
i really love your work. Tried do something similar but I couldnt get it right.
But your solution is still not working for me 😦
The programm starts fine, saying “Photobooth started” and taking a first picture.
The picture then opens but just very small in the bottom right corner. The Shell then states:
Traceback (most recent call last):
File “/home/pi/photobooth.py”, line 460, in
Next Picture()
File “/home/pi/photobooth.py”, line 226, in NextPicture
LoadImageObjectToScreen(object_list[current_image])
IndexError: list indext out of range
I’m not sure what to do now – if i press the button A it will take another picture but it just wont show it on the screen 😦
AfricanHauke,
Seems like the object_list is probably empty in your case. Verify that it gets loaded with the images in the ‘/images’ folder. Create one if you need to and add some images to it before you start. Verify its len(object_list) as well before you load it as well. Hope that helps, try printing the values to the terminal as well in the code so you can verify values at each step. Check other places in my code for example on how to do that.
Hello James.
This is interesting.
I already have a working DIY photo booth using PC and DSLR but I’m looking for something more portable.
I have a little Arduino experience, but it seems like Raspberry Pi is way different in terms of programming. Though I am willing to learn.
But first, before I go deeper, I would like to ask few things if can be done with additional codes:
1. Is it possible to group images, let say 4, into 1 final picture?
2. If so, is it also possible to have templates with themes in jpg or png formats?
3. Auto share to social network/s (FB, Twitter, etc.).
4. How about selective printing, is it also possible?
If above is a little complicated or might slow down the Pi, would it be possible to have 2 Pi’s where 1 handles the shooting part and the other handles the preview, sharing and printing?
I still do have ample time to learn, prepare and materialize this project before my daughter’s debut party. 🙂
Your input will be very helpful.
Thanks a lot.
Alain, all of those things are possible. The RPi is a full blown computer (albeit a lower powered one). Combining the images should be easy enough, there are lots of python libraries for image manipulation. There are also lots of libraries that will allow you to post images to social media. Look at my RPi “point and shoot” camera project for an example for posting to Google Plus. The RPi can act as a webserver that allows other web browsers to connect and view (and print) the images that have been collected.
First of all, thank you for your reply.
I just received my RPi yesterday. I just installed Raspbian last night.
I will be playing with the Pi today to understand its interface.
Once comfortable enough, I will then proceed with my photobooth project.
Sounds good Alain, keep me posted on your progress
Hey,
This is a great project, thank you for posting.
I was successful in running it (using push buttons wired into the GPIOs vs remote) and commenting out the pygbuttons, however i have 2 issues:
1. The preview is extremely slow
2. The image quality is very low
when i run Gphoto commands the pictures turn out fine, however when taken through the code they come out grainy.
Do you know what could be causing the slow live feedback?
Thanks!
Anyway you could post a video showing the issue? also take a look at the code and have it print the Gphoto command that it is using and see what happens when you execute that command outside the program. There has to be a difference between the 2 ways of calling it. For me the “preview” command used for the preview image in the right corner produces a lower quality image here:
gphoto2 --capture-preview --filename preview.jpg --force-overwritebut the capture-image-and-download command used for capturing the actual photos produces a full res image:
gphoto2 --capture-image-and-download --filename images/{image_name}I am getting like 8-15 fps for the preview image, which I know is not fast enough for true video feel, but should be enough in order to line up a shot. Let me know if that helps.
TLDR: check the commands, and verify that you are executing the right command when you are pressing the button.
Thanks so much for the feedback
I’m gonna have another go this weekend and I’ll let you know!
Thanks again for the reply. I managed to sort out the quality of picture issue (I was pulling the preview pictures as the main pictures for some reason, but I sorted that out now)
My FPS is extremely low though, something like 0.2, do you think this might have something to do with the camera? I’m using a EOS 700D
Ill try and take a video to show you
yeah that is slow, the way I implemented that is slow because at the time it was the easiest way to emulate a viewfinder. What it does is asks the camera to take a low resolution “preview” image that takes less time to load and doesn’t require the flash. There may be new ways to stream video using gphoto, but at the time (2 years ago?) that was the best I could come up with. You are more than welcome to submit a PR on GitHub:
https://github.com/contractorwolf/RaspberryPiPhotobooth
Im thinking of the same project but using webcam instead. Is it possible to use webcam for this rather than a digicam or dslr. i have a raspi2b, spare Lg lcd monitor, microsoft and logitech webcams and a bunch of patience on hand LOL
Wilson, you certainly can use a webcam an capture an image from that, I tried the same thing initially but found that a camera meant to do video does a terrible job at capturing high def images. Mainly this is because a normal SLR camera captures a single image extremely quickly (to prevent blurring) and uses a flash for proper lighting, a webcam doesnt do either of those things well. I was working on a device for my wedding and needed ultra high def and well lit images.
James I have some questions for you. my first one is can you tell me how to hook up the RPi to a single button? Second, what do I have to change to get it hooked up? Last, can you write the code for it for me please?
I am doing this as a project for the South Milwaukee High School Tech ED. Dept. so if you can please simplify things.
Thanks for the time you put into do all that you have do it will help others I am sure.
I have a lot of documentation on how to connect to the RPi on my “point and shoot” camera project here:
https://contractorwolf.com/raspberry-pi-point-shoot-camera/. It includes the description on how to connect the hardware as well as how to address the button in software.
Thank you
hello james
one short question, which opto-isolators did you use?
thanks in advance
@swe I really cant remember which ones they were, but it was something like this:
Click to access 2049908.pdf
hope that helps
Thank you so much for your sharing. I’m very new to all that but very keen to learn.
What need to be change so I can use it without the control and just with the camera button itself?
Thanks heaps
Elad
This should be possible, but you would have to still connect the gphoto library to the camera so you could access the images stored on the card. You would also need to poll the gphoto library looking for any new pictures to be displayed. You could remove large sections of my code that just dealt with looking for the button press, but i would test it without removing code first and be sure you can identify that there were new pictures found BEFORE starting to remove my button pressing code. That way you can more easily identify problems that may come up before attempting to delete code. My button press code will be ignored if there isnt a button connected 🙂 Good luck!
Pingback: RaspberryPiPhotobooth: GitHub File Free Download